Online measurement of diameter, eccentricity and ovality
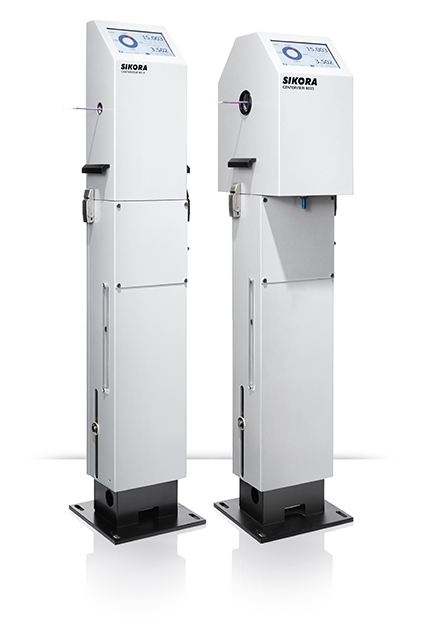
For more than four decades, manufacturers in automotive cable lines worldwide have relied on SIKORA’s measuring devices to ensure the quality and dimensional accuracy of the core while reducing material consumption to a minimum. The CENTERVIEW 8000 is particularly convincing due to its versatile application possibilities. Whether thin signal cables, standard data cables or thicker battery cables, – the CENTERVIEW 8000 is a true all-rounder.
SIKORA offers two models for different cable dimensions. The CENTERVIEW 8010 is mainly suitable for the measurement of small coaxial, data or automotive cables with a diameter from 0.25 to 10 mm (.01 to .39 inch). Optionally, for example for micro coaxial cables, the system is also available for diameters from 0.1 mm(.004 inch).The CENTERVIEW 8025 measures larger products with diameters from 0.5 to 25 mm(.02 to 1 inch). Thus, the system can also measure thick battery cables, which are increasingly installed in electric cars.
The CENTERVIEW 8000 is also flexible in terms of its position in the production line. As an alternative to the classic cold measurement at the end of the line, the gauge head can also be installed directly after the extruder and thus before the cooling section. This allows fast measurement and control for maximum production efficiency with equally highest quality demands.
Intelligent operating principle
The system combines an optical with an inductive measuring method. The inductive measuring circuit measures the exact position of the conductor, while the optical system measures the outer position of the core. The optical part is based on the principle of diffraction analysis combined with pulse-driven laser diodes, whose light beam projects an image of the cable on the respective CCD line in each measuring axis. Two optical systems measure the position and width of the shadows over 4 axes at 8 points. From the position of the shadows in relation to the inductively measured position of the conductor, the eccentricity is calculated within microseconds directly in the gauge head. From the width of the four shadows, the optical systems also precisely determine the respective outer diameters and ovality.
Automatic height adjustment of the measuring head
The inductive measuring circuit automatically positions the gauge head so that the conductor always passes through the center of the gauge head – that is where the measuring accuracy is highest. The system also independently detects and automatically compensates for slanted positions of the conductor. This eliminates the need for guide rollers, manual presetting, or readjustment of the system. This avoids deformation of the product and relieves the operator considerably in his daily work.
Wide range of display options
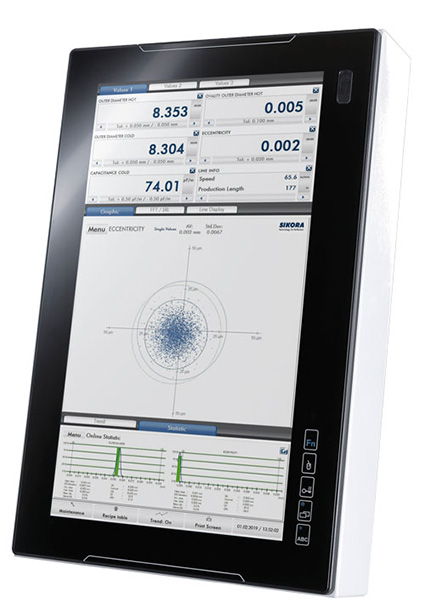
The CENTERVIEW 8000 is available on demand with an integrated 7-inch TFT touch screen monitor on which the production data is displayed. Alternatively, the system can be connected to a SIKORA ECOCONTROL processor system via common interfaces. By means of a sectional view of the core, the operator receives a standard display of the eccentricity, enabling him, for example, to center the crosshead.
Due to the extremely low exposure time of 0.25 μs, the CENTERVIEW 8000 captures oscillating eccentricity values with high single value accuracy. These are displayed in the form of a scatter plot which is an alternative display mode of the ongoing measurement on the ECOCONTROL. The scatter plot, which consists of a total of 5,000 points, graphically shows the distribution of short-term fluctuations in eccentricity. Each point corresponds to a single value of the eccentricity with respect to magnitude and direction. The extent of the scatter plot thus characterizes the standard deviation of the eccentricity. This unique visualization enables the operator to recognize which eccentricity values persist even after optimal centering and which fluctuation range is present. Based on this, the operator can initiate appropriate measures to minimize it.
Hot/cold control and FFT analysis
The CENTERVIEW 8000 can optionally be combined with the hot/cold control module of the ECOCONTROL 6000 or 1000. The module continuously calculates the material shrinkage and automatically takes it into account when controlling the diameter.
In addition, the CENTERVIEW 8000 provides information about eccentricity values and cold diameters, which can be used in combination with the ECOCONTROL 6000, the LASER Series 2000/6000 (hot diameter) and the CAPACITANCE 2000 (capacitance values) for FFT analysis and calculation of return loss.
Continuous precision without calibration
The CENTERVIEW 8000 is factory calibrated prior to shipment. After on-site installation, a onetime concentricity adjustment is performed. No further calibration, maintenance or adjustments to different product dimensions are required.


